Roofing Drip Edge Installation: Why Drip Edges Are Essential for Roof Health
Roofing drip edge installation represents one of the most critical yet frequently overlooked components in residential roofing systems. This simple L-shaped metal flashing installed along roof edges protects fascia boards from water damage, directs runoff into gutters, prevents shingle blow-off, and blocks pest infiltration beneath roofing materials. Despite costing just $2-4 per linear foot, proper drip edge installation prevents thousands in water damage, structural repairs, and premature roof failure. Northern Virginia's climate—featuring intense rainfall, freeze-thaw cycles, and severe weather—makes quality drip edge installation essential for long-term roof performance throughout Reston, Herndon, and surrounding communities.
What Is a Roofing Drip Edge?
A roofing drip edge is metal flashing—typically aluminum or galvanized steel—bent into an L or T shape and installed along roof perimeters beneath shingles. The horizontal leg extends under roofing materials while the vertical leg hangs over roof edges, directing water away from fascia boards and into gutters. This simple component serves multiple critical functions protecting both roofing systems and underlying structures from moisture damage, pest intrusion, and wind-related failures that compromise roof integrity.
Modern building codes in most jurisdictions require drip edge installation, recognizing its importance for roof longevity and building envelope protection. However, many older homes lack drip edges—installed during eras when codes proved less stringent or enforcement lax. Homes built or re-roofed without drip edges experience accelerated fascia deterioration, ice dam formation, shingle edge failure, and increased maintenance costs. Understanding drip edge functions and proper installation techniques helps homeowners ensure roof replacement projects include this essential component protecting long-term investments.
Primary Functions of Drip Edge
Water direction represents drip edge's most obvious function. Without drip edge, water running off shingles follows capillary action backward underneath shingle edges, soaking fascia boards, soffit materials, and roof decking. This moisture infiltration causes wood rot, paint peeling, and structural deterioration requiring expensive repairs. Drip edge breaks this capillary action, forcing water to drop cleanly into gutters rather than wicking backward into building components.
Wind uplift resistance improves significantly with proper drip edge installation. The metal edge provides secure anchor point for shingle starter courses, preventing wind from lifting and tearing shingles from roof edges—a common failure mode during severe storms. This protection proves especially valuable at gable ends and eaves where wind forces concentrate. Additionally, drip edge blocks insects, birds, and small animals from accessing spaces between shingles and decking where they establish nests or cause damage. These combined protective functions make drip edge installation essential for comprehensive roof system performance and longevity.
Types of Drip Edge Profiles
Type C drip edge features simple L-shape with horizontal and vertical legs meeting at approximately 90-degree angle. This basic profile—measuring 2-3 inches on horizontal leg and 1.5-2 inches on vertical leg—provides adequate protection for most applications at lowest cost. Type C works well for standard gutter installations where simple water direction suffices without requiring extended vertical drops or complex configurations.
Type D drip edge incorporates extended vertical leg creating T-shaped profile. The extended drop (typically 2-3 inches) better directs water into gutters while providing enhanced fascia protection. This profile suits homes with deeper fascia boards or applications requiring greater water projection away from building envelope. Type F drip edge adds additional horizontal extension creating wider coverage protecting larger fascia areas—beneficial for custom applications or architectural details requiring enhanced protection. Premium drip edges incorporate drip lips or hemmed edges improving water shedding while adding rigidity preventing oil-canning or distortion during installation and service.
Material Options and Durability
Aluminum drip edge dominates residential applications due to favorable cost-performance balance. Aluminum resists corrosion naturally, accepts paint finishes matching roof or fascia colors, and costs $2-3 per linear foot installed. Lightweight aluminum installs easily without special tools while maintaining shape throughout decades of service. Standard mill finish aluminum works well though painted versions provide better aesthetics and additional corrosion protection beneficial in harsh coastal or industrial environments.
Galvanized steel drip edge offers superior strength and rigidity compared to aluminum but sacrifices corrosion resistance—particularly at cut edges where protective zinc coating breaches. Steel costs slightly less than aluminum ($1.50-2.50 per linear foot) but requires painting preventing rust. Steel better resists bending and distortion during installation and service, making it preferred choice for commercial applications or situations demanding maximum strength. However, residential installations typically favor aluminum's corrosion resistance and ease of handling over steel's strength advantages.
Premium Material Choices
Copper drip edge delivers unmatched longevity and distinctive appearance developing rich patina over decades. Copper lasts 100+ years—far exceeding typical roof lifespans—making it investment suitable for premium homes or historical restorations where authenticity and longevity justify costs. Copper runs $8-15 per linear foot installed—3-5 times aluminum prices—positioning it as specialty choice for discerning homeowners prioritizing aesthetics and permanent solutions over economical alternatives.
Vinyl drip edge offers corrosion-proof alternative at economy pricing ($1-2 per linear foot). However, vinyl's flexibility and lower strength make installation challenging while providing less effective water direction and wind protection. UV exposure causes brittleness over time particularly in darker colors. Most professional roofers avoid vinyl drip edge due to performance limitations and installation difficulties despite lower material costs. For Northern Virginia applications, aluminum represents optimal balance of performance, cost, and longevity suitable for residential roofing projects.
Color and Finish Options
Natural aluminum mill finish provides cost-effective solution with adequate corrosion protection. However, unfinished aluminum's bright metallic appearance clashes with most roof colors creating visual distraction. Painted drip edge—available in white, brown, black, and custom colors—blends aesthetically with fascia, gutters, and roofing materials creating cohesive appearance. Factory-applied paint finishes outlast field-applied options while adding minimal cost ($0.25-0.50 per linear foot).
Matching drip edge color to gutter systems creates integrated look while contrasting colors can highlight architectural details. Dark colors suit darker roofing materials while white or light colors complement lighter shingles and trim. Some homeowners match drip edge to fascia color creating seamless transition while others coordinate with gutters for unified water management system appearance. These aesthetic considerations, while secondary to functional performance, enhance curb appeal and property value making color selection worthwhile during specification process.
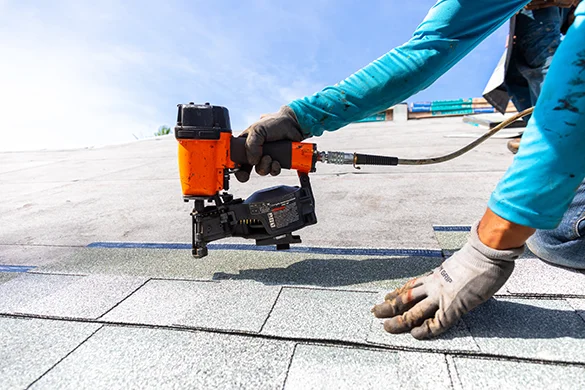
Proper Installation Techniques
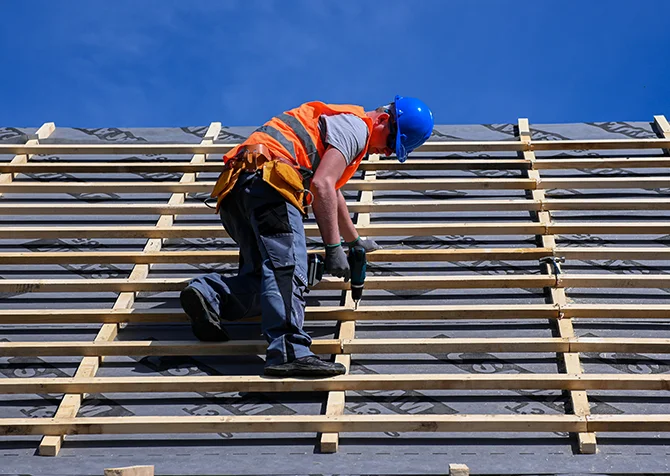
Roofing drip edge installation begins at eaves before any other roofing materials install. Drip edge attaches directly to roof decking using roofing nails spaced 8-12 inches apart along the horizontal leg. This creates secure foundation preventing movement while providing substrate for subsequent underlayment and shingle installation. Sections overlap 2-3 inches ensuring continuous protection without gaps allowing water infiltration. Overlaps should progress in same direction as water flow preventing reverse water migration at joints.
At eaves, drip edge installs before underlayment, allowing water infiltrating beneath underlayment to drain over drip edge rather than behind it. At rake edges (gable ends), drip edge installs over underlayment preventing wind-driven rain from accessing space between drip edge and decking. This sequencing—eave drip edge first, underlayment second, rake drip edge third—ensures proper water management and wind protection. Attention to these installation sequences separates professional installations from amateur attempts compromising system effectiveness.
Critical Installation Details
Corner treatments require careful attention ensuring continuous protection at roof edges meeting at valleys, hips, or gable-eave intersections. Miter cuts at 45-degree angles create clean corners though overlapping sections work adequately for most applications. Avoid gaps at corners where water can penetrate behind drip edge defeating protection purposes. Some installers use sealant at corner overlaps providing additional leak protection particularly in severe weather zones.
Gutter integration demands proper positioning ensuring drip edge extends into gutter channels directing water flow without overshooting or falling short. Drip edge should extend 1/4-1/2 inch into gutters—sufficient for positive drainage without interfering with gutter flow capacity. Too little extension allows water to miss gutters and run behind fascia. Excessive extension can dam water flow or interfere with gutter covers. This precision ensures effective water management protecting both roof edges and foundation drainage systems from moisture damage affecting Vienna and McLean area properties.
Common Installation Mistakes
Omitting drip edge entirely represents the most serious error—surprisingly common in budget-focused re-roofing projects or DIY attempts. Contractors cutting corners eliminate drip edge saving $200-400 on typical homes but creating vulnerability to thousands in future water damage and structural repairs. Homeowners should verify drip edge inclusion in roofing contracts and observe installation ensuring this critical component receives proper attention rather than getting skipped or installed incorrectly.
Incorrect installation sequence—particularly installing rake drip edge before underlayment—allows wind-driven rain to infiltrate behind drip edge soaking roof decking. Insufficient overlap at seams creates gaps permitting water intrusion and pest access. Using wrong fastener types or spacing allows drip edge movement compromising effectiveness. Failing to coordinate drip edge with gutter positioning results in water missing gutters and damaging fascia. These mistakes, while easily prevented through proper training and attention, commonly occur in rushed installations or when inexperienced crews attempt roofing work without understanding system integration requirements.
Retrofit Installation Challenges
Adding drip edge to existing roofs without complete re-roofing presents challenges but remains possible and often worthwhile for older homes experiencing fascia deterioration or gutter overflow. Retrofit drip edge installation requires carefully lifting shingle edges, sliding drip edge underneath, and securing it to decking without damaging existing shingles. This delicate process succeeds best during moderate temperatures when shingles remain flexible rather than brittle winter conditions or hot summer days when asphalt becomes tacky.
Costs for retrofit drip edge installation run $3-6 per linear foot—higher than new construction installation due to additional labor and care required. However, these costs prove minimal compared to repairing water-damaged fascia, soffit, or roof decking resulting from missing drip edge. Homeowners noticing fascia rot, paint peeling, or ice dam issues should consider retrofit drip edge installation even between roof replacement cycles. This preventive measure protects against progressive damage while extending existing roof life making it cost-effective investment for homes lacking this essential component.
Inspection and Maintenance
Drip edge requires minimal maintenance but benefits from periodic inspection ensuring continued effectiveness. Check that drip edge remains securely fastened without loose sections, particularly after severe storms potentially stressing connections. Verify gutters remain properly positioned relative to drip edge—settling or movement can create gaps allowing water to bypass gutter systems. Clear debris accumulation preventing water flow over drip edge into gutters.
Inspect painted finishes for deterioration, particularly at cut edges where bare metal exposure can initiate corrosion. Touch up paint prevents rust on steel drip edge while maintaining appearance on aluminum installations. Look for bent or damaged sections from falling branches, ice dam formation, or gutter maintenance accidents. Replace damaged drip edge sections promptly preventing water damage to underlying structures. These simple inspection tasks during routine roof maintenance preserve drip edge function throughout roof lifespan.
Integration with Ice and Water Barrier
Ice and water barrier—self-adhering waterproof membrane—installs over drip edge at eaves providing enhanced protection against ice dam leaks. This membrane adheres to decking and drip edge creating watertight seal preventing water backup from ice dams or wind-driven rain. Building codes in cold climates typically require ice and water barrier extending 2-6 feet up roof from eave edge depending on local climate severity and roof pitch.
Proper sequencing installs drip edge first, then ice and water barrier overlapping drip edge by 1-2 inches, followed by standard underlayment. This layered approach directs water progressively toward drip edge while preventing reverse migration. The ice and water barrier bonds to drip edge creating integrated system rather than separate components. This integration proves especially critical in Northern Virginia where ice dams form during freeze-thaw cycles common in winter months. Proper installation prevents leak damage costing thousands in ceiling, insulation, and structural repairs throughout Arlington and Fairfax communities.
Code Requirements and Compliance
International Residential Code (IRC) requires drip edge installation at eaves and gable ends for all asphalt shingle roofs. Local jurisdictions may adopt more stringent requirements specifying drip edge profiles, materials, or installation methods. Building permits for roof replacement trigger code compliance reviews ensuring drip edge installation meets current standards even when existing roofs lack this protection. Homeowners should verify contractors include code-compliant drip edge in roofing contracts and obtain necessary permits ensuring inspection verification.
Shingle manufacturer warranties increasingly require proper drip edge installation maintaining coverage. Missing or improperly installed drip edge can void warranty claims for edge blow-off, water damage, or premature failure. Insurance claims for wind or water damage may face scrutiny when drip edge installation fails to meet code requirements or industry standards. These compliance considerations extend beyond building code adherence, affecting financial protection and long-term roof system performance making proper drip edge installation essential rather than optional component of quality roofing projects.

Impact on Roof Lifespan and Performance
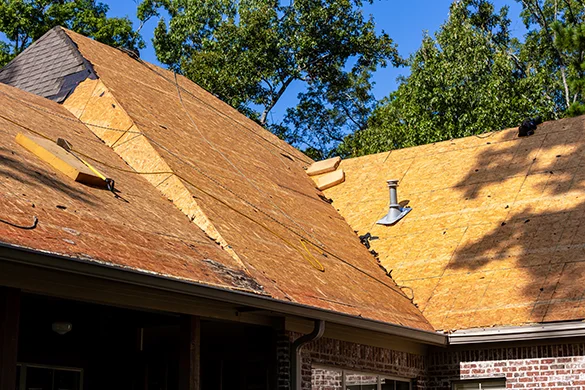
Proper roofing drip edge installation extends roof life 3-5 years on average by preventing water damage to decking, fascia, and shingle edges. Homes without drip edge experience accelerated deterioration at roof perimeters where moisture exposure concentrates. Fascia boards rot requiring replacement during re-roofing, adding $1,500-3,000 to project costs. Roof decking edges deteriorate from moisture infiltration necessitating sheathing replacement before new shingle installation—another $800-2,000 expense easily prevented through proper drip edge installation.
Wind damage reduction represents significant drip edge benefit. Shingle starter courses properly secured to drip edge withstand higher wind speeds without blow-off compared to installations lacking this anchor point. Hurricane and severe thunderstorm damage commonly initiates at roof edges where wind forces concentrate—proper drip edge installation significantly reduces this vulnerability. The combined protection against water damage, wind uplift, and pest intrusion makes drip edge installation among the highest-value components in roofing systems relative to cost—spending $300-600 for typical homes prevents thousands in damage and premature roof failure.
Gutter System Coordination
Drip edge and gutter systems work together as integrated water management preventing foundation damage, basement flooding, and landscape erosion. Properly positioned drip edge directs water into gutters rather than behind fascia boards or overshooting gutters entirely. This coordination requires careful attention during both drip edge and gutter installation ensuring compatible positioning and proper water flow paths from roof surface through gutters to downspouts.
Gutter replacement or repositioning often necessitates drip edge adjustment maintaining proper alignment. When installing new gutters on homes with existing drip edge, verify compatibility before proceeding—misaligned systems waste both components' effectiveness. Some gutter systems incorporate integral drip edge eliminating separate installation though these combinations typically cost more than standalone components. For most Northern Virginia homes, traditional separate drip edge and gutter systems provide optimal flexibility, repairability, and cost-effectiveness protecting properties from water damage year-round.
Preventing Ice Dam Formation
Drip edge plays supporting role in ice dam prevention by promoting proper drainage preventing water accumulation at eaves. However, drip edge alone cannot prevent ice dams resulting from inadequate attic insulation and ventilation. Comprehensive ice dam prevention requires proper insulation maintaining cold roof decks, adequate ventilation removing heat buildup, and air sealing preventing warm air from entering attic spaces.
When ice dams do form, quality drip edge installation with proper ice and water barrier integration prevents leak damage. Water backing up behind ice dams encounters waterproof membrane and drip edge rather than infiltrating directly to decking and interior spaces. This backup protection proves essential during severe winters when even well-insulated homes experience occasional ice dam formation. Northern Virginia's variable winter weather—frequent freeze-thaw cycles—makes this protection especially valuable preventing leak damage during conditions favoring ice dam development on north-facing roof slopes and shaded areas.
Cost-Benefit Analysis
Roofing drip edge installation adds $300-800 to typical residential re-roofing projects depending on home size and drip edge material selection. This represents just 2-4% of total roof replacement costs yet provides protection against damage potentially costing thousands in fascia replacement, decking repairs, and interior water damage remediation. The ROI on drip edge installation proves exceptional—every dollar spent preventing $5-10 in future damage and maintenance costs.
Beyond direct damage prevention, drip edge installation maintains roof warranty coverage potentially worth tens of thousands if premature failure occurs. It enhances property values through improved condition and reduced maintenance requirements appealing to buyers. Insurance claims for wind or water damage benefit from code-compliant installations reducing dispute likelihood and claim denial risk. These combined financial benefits make drip edge installation obvious choice for any roofing project where long-term value and protection take priority over absolute minimum upfront costs.
Choosing Qualified Roofing Contractors
Proper roofing drip edge installation requires skilled contractors understanding sequencing, material selection, and integration with other roofing components. Verify contractor knowledge by asking specific questions about drip edge types, installation sequences at eaves versus rakes, and coordination with ice and water barrier. Contractors unable to explain these details clearly may lack expertise ensuring quality installation protecting your investment.
Request detailed written estimates specifically listing drip edge materials by type, quantity, and cost. Vague "includes all materials and labor" estimates allow contractors to skip drip edge or use inferior products without accountability. Photographs of completed projects showing proper drip edge installation demonstrate contractor capability. References from recent re-roofing clients provide verification of quality work and professional practices. These due diligence steps identify qualified contractors delivering complete, code-compliant installations rather than shortcuts compromising roof performance and longevity.

Regional Considerations for Northern Virginia
Northern Virginia's climate presents specific challenges making quality drip edge installation especially important. Heavy rainfall events—particularly severe thunderstorms—test water management systems with intense, sustained precipitation overwhelming inadequate drainage. Freeze-thaw cycles stress roof edges where ice formation and melting concentrate. High humidity promotes rot in wood components lacking proper moisture protection. These conditions demand robust drip edge installation using quality materials and proper techniques ensuring reliable long-term performance.
Local building codes in Fairfax County, Loudoun County, and surrounding jurisdictions require drip edge installation meeting IRC standards minimum. Some localities mandate specific installation details addressing regional climate challenges. HOA regulations in planned communities may specify drip edge colors or profiles maintaining aesthetic consistency. Working with locally experienced contractors familiar with these requirements ensures code compliance while addressing regional performance demands protecting homes throughout varied Northern Virginia microclimates and weather patterns.
Ready to Ensure Proper Drip Edge Protection?
Roofing drip edge installation represents essential component in comprehensive roof systems protecting homes from water damage, wind uplift, and pest intrusion. Understanding drip edge functions, proper installation techniques, and material options helps Northern Virginia homeowners ensure re-roofing projects include this critical protection. Whether replacing aging roofs or addressing specific water management issues, quality drip edge installation provides exceptional value protecting property investments and preventing costly damage throughout roof lifespans.
Reston Roof provides professional roofing services throughout Northern Virginia including proper drip edge installation on all residential roofing projects. Our experienced team understands local building codes, climate challenges, and installation techniques ensuring code-compliant, high-performance roof systems. We use quality materials including aluminum drip edge in colors matching your home's aesthetics while providing superior protection. Contact us at (571) 453-6515 for free roofing consultation. We'll inspect your current roof, explain options, and provide detailed estimates including proper drip edge installation protecting your home from water damage and structural deterioration. Invest in quality roofing components that prevent problems rather than just covering them—your home deserves comprehensive protection delivered by skilled professionals committed to excellence.
Frequently Asked Questions
What is a roofing drip edge and why is it important?
A roofing drip edge is an L-shaped metal flashing installed along roof perimeters beneath shingles. It directs water away from fascia boards into gutters, prevents capillary action drawing moisture under shingles, provides anchor points resisting wind uplift at roof edges, and blocks pest infiltration. Despite costing just $2 to $4 per linear foot, it prevents thousands in water damage and is essential for any roof replacement project.
How much does drip edge installation cost?
Drip edge installation typically adds $300 to $800 to a residential re-roofing project depending on home size and material choice. Aluminum drip edge costs $2 to $3 per linear foot installed, galvanized steel runs $1.50 to $2.50, and copper costs $8 to $15 per linear foot. Retrofit installation on existing roofs runs $3 to $6 per linear foot due to additional labor required.
Can drip edge be added to an existing roof without full replacement?
Yes. Retrofit drip edge installation is possible by carefully lifting shingle edges and sliding drip edge underneath. This works best during moderate temperatures when shingles remain flexible. While retrofit costs more than new-construction installation at $3 to $6 per linear foot, it prevents progressive fascia damage and is worthwhile for homes experiencing water damage at roof edges.
What type of drip edge material is best for Northern Virginia?
Aluminum drip edge offers the best balance of performance and cost for Northern Virginia homes. It resists corrosion naturally, accepts paint finishes matching your roof or fascia colors, costs $2 to $3 per linear foot, and maintains its shape for decades. Painted aluminum versions provide better aesthetics and additional corrosion protection for the region's humid climate. Learn more about related components in our flashing installation guide.
Does building code require drip edge installation?
Yes. The International Residential Code requires drip edge installation at eaves and gable ends for all asphalt shingle roofs. Local Northern Virginia jurisdictions including Fairfax County and Loudoun County enforce these requirements through their roofing permit processes. Missing or improperly installed drip edge can void shingle manufacturer warranties and complicate insurance claims for wind or water damage.