Chimney Flashing Repair: Protecting Your Northern Virginia Roof from Chimney Leaks
Chimney flashing repair is one of the most critical roofing maintenance tasks a Northern Virginia homeowner can invest in, yet it remains one of the most frequently neglected. The flashing system around your chimney creates a watertight barrier at the exact point where brick or stone masonry penetrates your roof surface, and that intersection is the single most vulnerable leak point on any residential roof in the Reston, Fairfax, Herndon, and greater NOVA region.
When chimney flashing fails, water doesn't announce itself with a dramatic flood. It seeps silently into wall cavities, saturates insulation, and soaks ceiling joists for weeks or months before you notice the first discolored patch on your drywall. By that point, the damage behind the walls often runs into thousands of dollars, encompassing not just the flashing repair itself but drywall replacement, insulation removal, structural wood repair, and potentially mold remediation that Fairfax County health inspectors take very seriously.
Northern Virginia's climate makes chimney flashing failure more common here than in drier parts of the country. The combination of heavy summer thunderstorms that dump two inches of rain in 30 minutes, winter freeze-thaw cycles that expand and contract metal and masonry joints 40 to 60 times per season, and persistent humidity levels between 65 and 75 percent during summer months creates conditions that stress chimney flashing systems beyond their design limits if they aren't properly installed and maintained. This guide covers everything you need to know about chimney flashing systems, failure signs, repair options, costs, and how to protect your home for the decades ahead.
Understanding Chimney Flashing Systems and How They Work
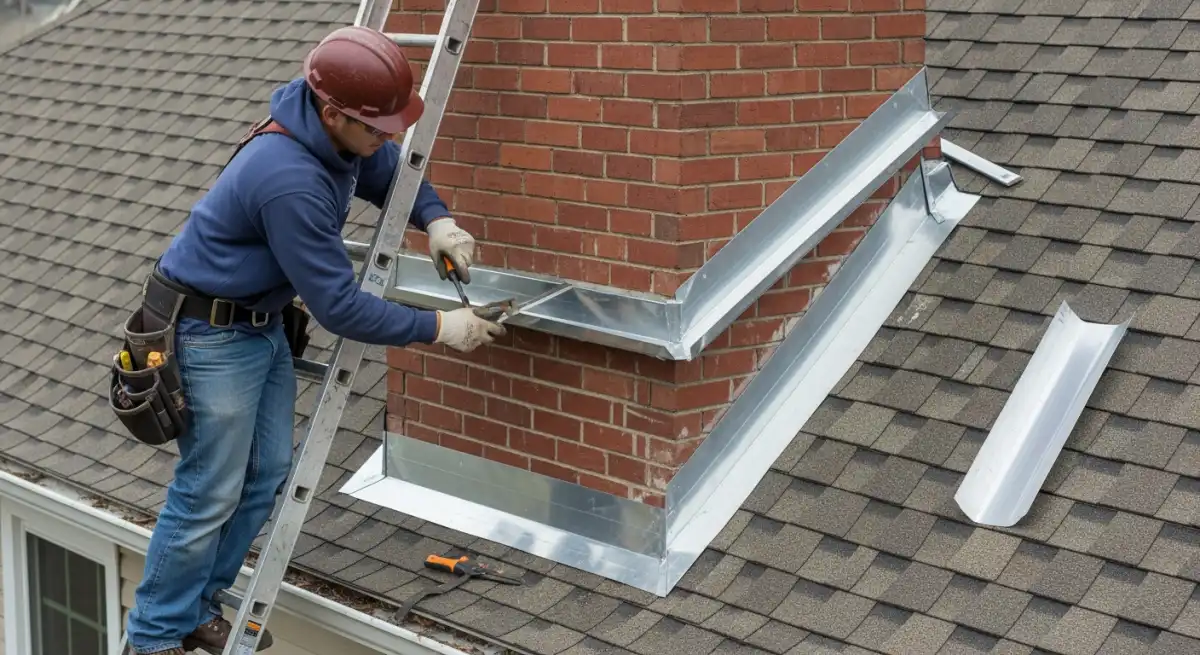
Properly installed chimney flashing uses a two-part system that many homeowners and even some general contractors don't fully understand. The system relies on overlapping layers that work together to channel water away from the chimney-to-roof junction, and each component plays a specific role in keeping your home dry.
Step flashing consists of L-shaped metal pieces installed along the sides of the chimney, woven between shingle courses in overlapping layers. Each piece measures typically 8 to 10 inches in both directions and directs water downward just like the shingles themselves. One leg extends 4 to 5 inches up the chimney face while the other lies flat beneath the adjacent shingle course. When properly overlapped by at least 3 inches, step flashing creates a shingled effect that prevents water from traveling sideways into the roof deck.
Counter-flashing is the second critical layer. It consists of metal pieces embedded into the chimney's mortar joints and folded down over the top edge of the step flashing. Counter-flashing prevents wind-driven rain, which is common during the intense thunderstorms that sweep through Fairfax County and Loudoun County from May through September, from penetrating underneath the step flashing's upper edge. Without counter-flashing, even perfectly installed step flashing will leak during heavy wind-driven rain events.
Base flashing sits at the bottom of the chimney where it meets the roof. This piece extends up the chimney face and sits on top of the shingles below, directing water onto the roof surface where it can drain normally. The headwall flashing at the top of the chimney performs a similar function on the uphill side. Wide chimneys also require a cricket, which is a peaked diverter structure on the uphill side that prevents water from pooling behind the chimney during heavy rain. Understanding how these components work together helps you recognize when flashing repairs are needed before water damage occurs.
Signs Your Chimney Flashing Needs Repair in Northern Virginia
Water stains on ceilings or walls near the chimney are the most common sign of flashing failure, but they're not the earliest. By the time you see a brown stain spreading across your living room ceiling in your Reston townhome or your Herndon colonial, the leak has been active for weeks. Learning to spot earlier warning signs saves you from the extensive interior damage that turns a $500 flashing repair into a $5,000 restoration project.
Inspect your chimney flashing from the ground with binoculars twice a year, ideally in spring after winter freeze-thaw damage and in fall before the wet season. Look for rust or corrosion on visible flashing metal, which indicates deterioration that will eventually create holes. Check for gaps between flashing and the chimney face or between individual flashing pieces. Loose or lifted counter-flashing that has pulled away from mortar joints leaves the step flashing exposed to weather. Cracked or dried-out sealant along flashing edges has lost its waterproofing ability.
Inside your home, check the attic space near the chimney after every heavy rainstorm. Look for damp insulation, water trails on rafters, or dark staining on the underside of the roof deck. Musty odors in rooms adjacent to the chimney suggest moisture is accumulating in wall cavities. Peeling paint or bubbling wallpaper near the chimney indicates moisture is migrating through the wall from a flashing leak above. Don't ignore these warning signs. Small chimney flashing leaks rapidly escalate into major water damage requiring expensive repairs beyond basic roof leak fixes.
Common Causes of Chimney Flashing Failure in NOVA
Improper installation is the leading cause of chimney flashing failure across Northern Virginia. Contractors who skip counter-flashing to save time and material costs create an immediate weak point that will leak during the first significant wind-driven rain event. Inadequate overlap between step flashing pieces, typically less than 3 inches, allows water to travel sideways between layers. Using the wrong materials, such as thin aluminum when heavier gauge galvanized steel or copper is needed, or mixing dissimilar metals that create galvanic corrosion, causes premature failure within 5 to 10 years.
Northern Virginia's freeze-thaw cycles place extraordinary stress on chimney flashing systems. Between November and March, the region experiences 40 to 60 freeze-thaw cycles in a typical winter. Water seeps into hairline gaps between flashing and masonry during daytime warming, freezes overnight, expands by roughly 9 percent, and widens those gaps with each cycle. Over five winters, this process can loosen counter-flashing from mortar joints, lift step flashing off the roof deck, and crack sealant joints that were watertight when first applied.
Chimney settlement is another common cause of flashing failure in the established neighborhoods throughout Reston, Vienna, Oakton, and Falls Church where homes built in the 1960s through 1980s have foundations that have settled unevenly over decades. As a chimney shifts even a fraction of an inch relative to the roof structure, it pulls flashing seams apart and creates gaps that no amount of caulk will permanently seal. Deteriorated mortar joints compound the problem by losing their grip on counter-flashing. Even quality installations eventually fail as sealants dry out after 5 to 7 years, metal corrodes from decades of exposure, or falling branches physically puncture flashing during the severe storms that regularly hit the Dulles corridor. Regular inspection catches issues before they escalate into the kind of problems that lead to costly roofing mistakes.
Step Flashing Installation: The First Line of Defense
Step flashing installation requires precision that distinguishes professional roofing work from amateur attempts. Each L-shaped piece must be installed alongside the chimney at every shingle course, with one leg extending up the chimney face and the other lying flat on the roof deck beneath the overlapping shingle. Proper overlap means each piece covers the one below by at least 3 inches, creating a continuous water barrier that channels rain and snowmelt downward without allowing lateral penetration.
Quality step flashing uses 16 to 26 gauge galvanized steel, aluminum, or copper depending on the roof's expected lifespan and the homeowner's budget. Each piece should be fastened to the roof deck rather than the chimney itself. This distinction matters because chimneys and roof structures settle and move independently over time. Fastening step flashing to the chimney causes the metal to crack and tear as the chimney shifts, while fastening to the roof deck allows the flashing to move with the roof and maintain its seal against the chimney face.
Common step flashing mistakes include using too few pieces, leaving gaps between courses where water can enter, fastening to the chimney instead of the deck, and using lightweight pre-formed flashing pieces that don't extend far enough up the chimney face or far enough under the shingles. Proper step flashing installation follows the same attention to detail required for quality roof repair projects throughout Northern Virginia.
Counter-Flashing: The Critical Protection Layer
Counter-flashing completes chimney waterproofing by covering the exposed upper edges of step flashing. Proper installation requires cutting reglets, which are narrow slots, into the chimney's mortar joints using a masonry saw. The counter-flashing metal is inserted 1 to 1.5 inches into these reglets and sealed with high-quality polyurethane caulk rated for masonry and roofing applications. The flashing then folds down over the step flashing, creating a lap joint that prevents wind-driven rain from getting underneath.
Many older chimneys across Northern Virginia lack proper counter-flashing because the original installers used only sealant or roofing cement instead, a shortcut that appears to work for a year or two but fails as the sealant dries, cracks, and separates from the masonry surface. Homes in the established neighborhoods along Hunter Mill Road in Oakton, around the Vienna town center, and in Reston's original cluster communities from the 1970s commonly have this deficient installation. True counter-flashing embedded in masonry lasts decades because the metal is mechanically locked into the chimney structure rather than relying on adhesion alone.
Repairing or retrofitting counter-flashing involves removing old sealant, cutting proper reglets if they don't exist, installing new counter-flashing metal, and sealing the reglet openings correctly. This specialized work requires masonry cutting skills, proper flashing fabrication, and roofing experience that goes beyond basic shingle installation. Professional expertise ensures results matching quality contractor standards that protect your home for 20 or more years.
Chimney Crickets: Preventing Water Pooling Behind Wide Chimneys
Chimneys wider than 30 inches require a cricket on the uphill side. Virginia building code mandates this, and for good reason. Without a cricket, water flowing down the roof slope hits the flat back wall of a wide chimney and pools rather than draining around it. During Northern Virginia's intense summer thunderstorms, which regularly dump 1 to 2 inches of rain in 30 minutes, this pooling creates hydrostatic pressure that forces water through flashing seams regardless of how well they were installed.
Winter conditions make the problem even worse. Snow accumulates behind wide chimneys, and the heat escaping through the chimney melts the snow closest to the masonry first. This meltwater refreezes at the flashing line, creating an ice dam that traps additional meltwater against the chimney base. Homes in the hillier areas of Great Falls, McLean, and the neighborhoods along Difficult Run are particularly susceptible because their steeper roof slopes channel more water toward chimney obstructions.
Cricket construction involves building a peaked frame from pressure-treated lumber, sheathing it with plywood or OSB, covering it with ice and water shield membrane, and integrating flashing that ties into both the roof surface and the chimney's counter-flashing system. Retrofitting a cricket during a chimney flashing repair costs $900 to $1,800 depending on the chimney width and roof pitch, but it permanently solves the pooling problem that causes recurring leaks on wide chimneys every few years. This investment parallels the long-term value of upgrading to properly integrated systems like TPO roofing on flat sections where water management is critical.
DIY vs. Professional Chimney Flashing Repair
Minor chimney flashing repairs suit capable homeowners who are comfortable working on a roof. Re-sealing small gaps where caulk has cracked or separated, replacing a section of deteriorated sealant along a counter-flashing edge, or pressing a lifted flashing piece back into position and re-caulking are reasonable DIY tasks. These fixes require quality polyurethane or butyl rubber caulk rated for roofing applications, costing $10 to $20 per tube, and can address temporary water intrusion when the underlying flashing metal remains structurally intact.
However, complete chimney flashing replacement demands professional expertise that most homeowners and general handymen don't possess. Properly cutting reglets into masonry without damaging the chimney's structural mortar requires a diamond-blade masonry saw and the skill to cut a consistent depth of 1 to 1.5 inches without going too deep. Installing step flashing means removing and carefully reinstalling multiple shingle courses without damaging the shingles themselves. Fabricating and installing counter-flashing requires metalworking skills to create custom pieces that match your chimney's specific dimensions and mortar joint spacing.
Most critically, mistakes with chimney flashing installation cause leaks worse than the original problem. A poorly cut reglet that's too shallow allows counter-flashing to pull out during the first freeze-thaw cycle. Improperly overlapped step flashing creates water entry points that are invisible from the exterior but dump water directly onto the roof deck. These failures typically don't become apparent until the next heavy rain, by which time additional water damage has occurred. Professional chimney flashing repair costs $900 to $2,200 depending on chimney size and complexity but delivers results that last 20 or more years. Compare that investment to the frustration and compounding expense of multiple failed DIY attempts.
Chimney Flashing Materials: Choosing the Right Metal
The flashing material you choose should match both your budget and your roof's expected remaining lifespan. Installing premium copper flashing on a 20-year-old asphalt shingle roof that will need replacement in 5 years makes no financial sense. Conversely, choosing the cheapest galvanized steel for a new 50-year metal roof means you'll need to replace the flashing long before the roof wears out.
| Flashing Material | Cost Per Linear Foot | Expected Lifespan | Corrosion Resistance | Best Application |
|---|---|---|---|---|
| Galvanized Steel | $2 - $5 | 20 - 30 years | Good | Standard asphalt shingle roofs |
| Pre-Painted Steel | $4 - $7 | 25 - 35 years | Very Good | Color-matched installations |
| Aluminum | $3 - $7 | 25 - 35 years | Excellent | Coastal or high-humidity areas |
| Stainless Steel | $10 - $20 | 50+ years | Excellent | Premium roofs, long-term homes |
| Copper | $18 - $30 | 70+ years | Superior | Historic homes, slate or metal roofs |
Galvanized steel remains the most common choice for chimney flashing on asphalt shingle roofs throughout Northern Virginia. It provides reliable performance at an economical price point and is readily available from every roofing supply house in the NOVA region. For homeowners planning to stay in their home long-term or installing premium roofing materials like metal standing seam, copper or stainless steel flashing makes better financial sense because the flashing lifespan matches the roof's expected service life.
One critical rule: never mix dissimilar metals in a flashing system. Galvanized steel in contact with copper, for example, creates galvanic corrosion that destroys the less noble metal within a few years. If your roof has copper elements, all flashing must be copper. If your gutters are aluminum, use aluminum or galvanized flashing rather than copper. Your roofing contractor should verify metal compatibility before ordering materials.
Chimney Flashing Repair Costs in Northern Virginia
Chimney flashing repair costs in the Northern Virginia market run 15 to 25 percent above national averages due to higher labor rates, the skilled trades shortage in the DC metro area, and the complexity that older homes in established neighborhoods present. Here's what you can expect to pay for different levels of chimney flashing work in the Reston, Fairfax, Herndon, and greater NOVA region.
Simple re-sealing and minor repairs where the underlying flashing metal is still intact run $200 to $450 for materials and labor. This level of work addresses small gaps in sealant, re-adheres lifted counter-flashing edges, and applies new caulk to joints that have dried and cracked. It's appropriate when the metal itself shows no rust-through, holes, or structural damage.
Partial chimney flashing replacement on one or two sides costs $450 to $900 depending on the chimney's size, height, and accessibility. This scope of work includes removing the damaged flashing, installing new step flashing and counter-flashing on the affected sides, and integrating the new work with the existing flashing on the undamaged sides.
Complete chimney flashing replacement including step flashing on all sides, new counter-flashing with properly cut reglets, base and headwall flashing, and all sealants ranges from $900 to $1,800 for standard single-flue chimneys. Large chimneys, multi-flue chimneys, or chimneys requiring cricket installation push the cost to $2,500 to $4,000. Premium materials like copper add another 30 to 50 percent to these numbers.
While these prices represent a significant investment, compare them to the cost of water damage repair. A single ceiling repair from a chimney flashing leak easily runs $2,000 to $6,000 once you factor in drywall, insulation, paint, potential structural wood repair, and mold remediation if moisture has been present for more than 48 hours. Understanding total cost implications helps you see chimney flashing repair as the preventive investment it truly is.
Preventing Future Chimney Flashing Problems
Annual inspections are the single most effective way to catch chimney flashing issues before they become active leaks. Schedule a visual inspection from the ground with binoculars every spring after the freeze-thaw season ends and every fall before the wet winter months begin. Look for rust spots, lifted edges, gaps between flashing and masonry, and deteriorated sealant. Check your attic near the chimney after every heavy rainstorm during the first year after any flashing work to confirm the repair is holding.
Clear debris from the areas around your chimney regularly. Leaves, twigs, and pine needles that accumulate against flashing trap moisture and accelerate corrosion. Homes in the wooded neighborhoods around Reston's Lake Audubon, Lake Thoreau, and the tree-lined streets of Vienna and Oakton deal with this issue more than homes in open developments. Trim overhanging branches that drop debris onto the roof near the chimney and that can physically damage flashing during wind events.
Re-seal flashing joints every 5 to 7 years as preventive maintenance. This costs $150 to $300 when done as part of a routine roof inspection and is far cheaper than the leak repairs that result from dried and cracked sealant. When your roofing contractor performs the re-sealing, have them evaluate the overall condition of the flashing metal and mortar joints so you can plan for replacement before failure occurs. Proper maintenance extends chimney flashing lifespan significantly, similar to the benefits gained from comprehensive roof maintenance programs.
When to Replace vs. Repair Chimney Flashing
The repair-versus-replace decision for chimney flashing follows clear guidelines that any experienced Northern Virginia roofer should explain to you before starting work. Minor sealant failures and small gaps where the underlying metal remains intact and corrosion-free are candidates for repair. Loose counter-flashing that simply needs re-securing in its reglet is a straightforward fix rather than a replacement.
Replace chimney flashing when the metal shows rust holes or perforations, when corrosion has weakened the metal to the point where it flexes or crumbles when pressed, or when physical damage from fallen branches or ice has bent or torn sections beyond repair. If more than 25 percent of the chimney flashing system requires attention, complete replacement typically costs less than extensive piecemeal repairs because the labor cost of accessing and working around existing flashing exceeds the cost of removing everything and starting fresh.
Missing counter-flashing that was never properly installed in the first place demands full replacement with correct installation methods. Surface-applied sealant or roofing cement used in place of embedded counter-flashing is not a repair. It's a temporary patch that will fail again, usually within two to three years in Northern Virginia's climate. When replacing your roof shingles, always replace chimney flashing simultaneously. The cost of accessing the chimney area represents the majority of the total flashing expense, so replacing the roof and leaving old flashing in place is false economy that leads to leaks within a few years of the new roof installation.
Frequently Asked Questions
How much does chimney flashing repair cost in Northern Virginia?
Simple re-sealing and minor chimney flashing repairs cost $200 to $450 in Northern Virginia. Partial flashing replacement on one side runs $450 to $900. Complete chimney flashing replacement including step flashing, counter-flashing, and sealants ranges from $900 to $1,800 for standard chimneys. Large or complex chimneys requiring cricket installation or copper flashing can reach $2,500 to $4,000. Northern Virginia pricing runs 15 to 25 percent above national averages due to higher labor rates and skilled trades demand in the DC metro area.
How do I know if my chimney flashing is leaking?
Common signs of leaking chimney flashing include water stains on ceilings or walls near the chimney, moisture running down the interior chimney face during rain, musty odors in rooms adjacent to the chimney, peeling paint or bubbling wallpaper near the chimney, and visible rust, gaps, or lifted metal on the flashing itself. Check your attic near the chimney after heavy rain for damp insulation or water trails on rafters. Early detection prevents the extensive water damage that turns a $500 flashing repair into a $5,000 interior restoration.
Can I repair chimney flashing myself or do I need a professional?
Minor re-sealing of small gaps with polyurethane caulk is a reasonable DIY project if you are comfortable working on a roof. However, complete chimney flashing replacement requires cutting reglets into masonry, removing and reinstalling shingle courses, and fabricating custom counter-flashing. These tasks demand specialized tools and experience. Improper DIY chimney flashing work often causes leaks worse than the original problem and can void manufacturer warranties on your roofing materials.
How long does chimney flashing last in Northern Virginia?
Galvanized steel chimney flashing lasts 20 to 30 years in Northern Virginia when properly installed and maintained. Aluminum flashing lasts 25 to 35 years. Copper flashing lasts 70 or more years. Sealants around flashing joints typically need re-application every 5 to 7 years regardless of the metal type. Northern Virginia's freeze-thaw cycles and persistent humidity can shorten these lifespans if flashing was poorly installed or maintenance is neglected.
Does my chimney need a cricket or saddle?
Virginia building code requires a chimney cricket on the uphill side of any chimney wider than 30 inches. Even chimneys slightly under that threshold benefit from a cricket in Northern Virginia because the region's heavy rains and snowmelt can pool behind wide chimneys and force water through flashing seams. Adding a cricket during a flashing repair costs $900 to $1,800 but permanently solves the water pooling problem that otherwise causes recurring leaks every few years.
Expert Chimney Flashing Repair in Northern Virginia
Reston Roofing specializes in chimney flashing repair and replacement throughout Northern Virginia. Our experienced team understands the complexities of two-part flashing systems, proper counter-flashing installation with masonry-cut reglets, and cricket construction for wide chimneys that cause recurring leaks. We provide thorough assessments, transparent pricing, and quality workmanship that stops chimney leaks permanently.
Serving homeowners in Reston, Fairfax, Herndon, McLean, and throughout the Northern Virginia region, we deliver comprehensive chimney flashing services including inspection, repair, complete replacement, and preventive maintenance programs. Every chimney flashing project includes a detailed written estimate, documentation of the work performed, and our commitment to standing behind the results.
Call us today at (571) 453-6515 or schedule a consultation online for expert chimney flashing evaluation and honest recommendations that protect your home for decades to come.